
Showing posts with label How To. Show all posts
How to make Ubuntu Linux look like Windows 7
OPERATING SYSTEM Slinux, ubuntu, how-to
Windows 8's tile-based interface puts a bold new spin on the familiar Windows interface—so bold that many long-time Windows users are threatening to jump ship to another operating system rather than learn Microsoft's "modern" UI. Of course, you'll still find yourself in foreign territory even if you actually follow through and make the jump. Installing a new operating system is easy, but wrapping your head around an alien environment can be more difficult, even if you're using a comparatively user-friendly OS like Ubuntu Linux.
Luckily, Linux is customizable—much, much more than Windows. In fact, if you're having trouble with the transition (or plopping Ubuntu on a parent's PC), you can tweak and tune the OS to feel pretty darned close to the Windows environment you've forsaken.
I’ll go through two methods here. One adapts Ubuntu’s default Unity desktop to make it feel slightly more like Windows, while the other entails a bit more work and a different desktop interface entirely to create a truly Microsoft-like experience.
Creating a Windows 7-style Ubuntu
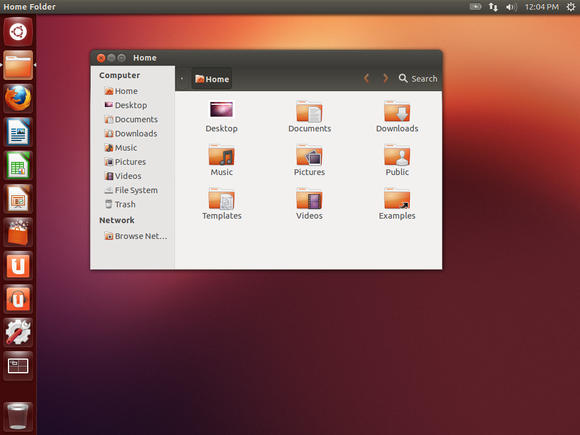
To be completely honest, Ubuntu's default Unity desktop may be slick and pretty, but it isn’t the most configurable Linux environment around. The taskbars running the top and left sides of its screen are locked in place and can’t be moved whatsoever. Unity is still fairly flexible, however, and some basic—for Linux—tweaks can give it some of that old Windows 7 charm.
A quick note: These tips were tested on Ubuntu 12.10, the most current version of the operating system at the time of publication.
We’re going to use some terminal commands throughout the course of this article. If you’re a new Linux user, don’t be scared—Linux’s powerful command line makes it easy to follow instructions you’ll find in articles like this one. Instead of following a list of long steps telling you to click here and click there, you can just copy and paste these commands into a terminal window and hit Enter.
To open a terminal, press the Windows key (known as the Super key in Linux), type
Terminal, and press Enter. You can also click the Ubuntu logo at the top-left corner of your screen instead of pressing the Windows key.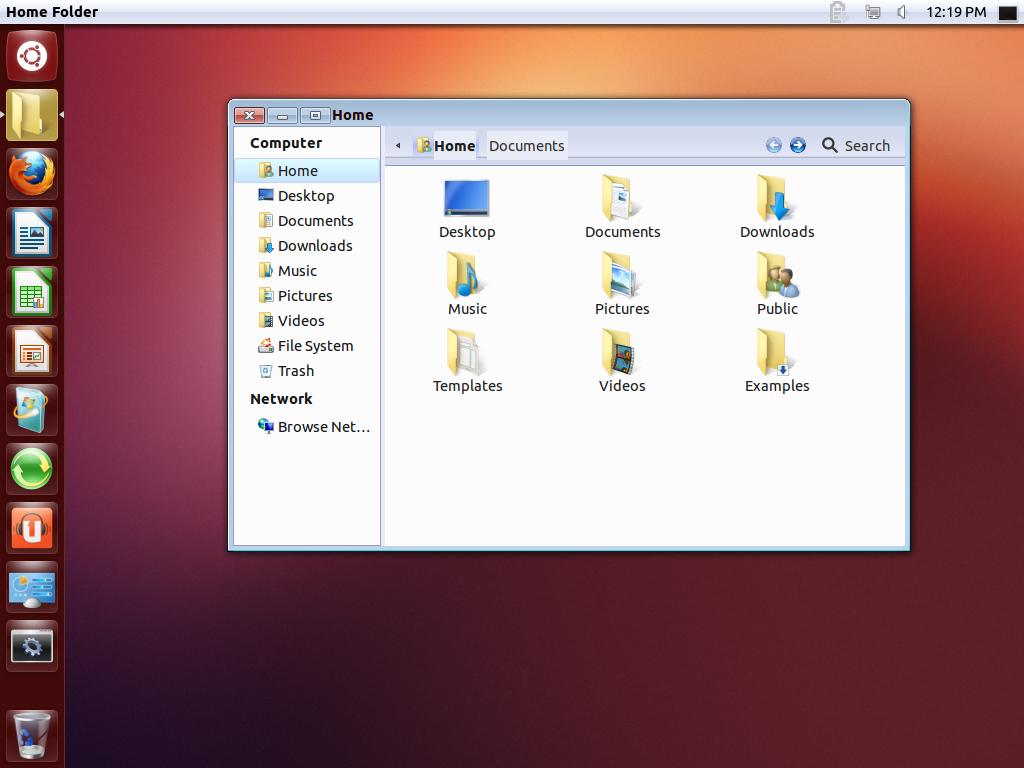
First, we’re going to install a Windows 7 theme pack. Copy and paste the following commands into the terminal window in order, pressing Enter after each command to run it. The first command adds a personal package archive (PPA) to your system that Ubuntu can install packages from. The second command downloads information about the newly available packages, and the third command installs the Windows 7 theme—no installation wizard required. Typing
sudo before each command allows it to run with root permissions, similar to running a program as administrator in Windows.sudo add-apt-repository ppa:upubuntu-com/gtk3sudo apt-get updatesudo apt-get install win2-7
The Win2-7 theme is now installed. To enable the icon, window border, and widget theme, copy and paste the following commands into the terminal. As you run each command, you’ll see your desktop gradually transform and become more Windows-like.
gsettings set org.gnome.desktop.interface gtk-theme 'Win2-7-theme'gsettings set org.gnome.desktop.wm.preferences theme 'Win2-7-theme'gsettings set org.gnome.desktop.interface icon-theme 'Win2-7-icons'
The taskbar-like launcher at the left side of your screen will still be a different color. Never fear—like Windows 7’s taskbar, the launcher derives its colors from your desktop wallpaper. For this article, we’ll use Windows 7’s default wallpaper, which you can find all over the Internet. (I snagged my copy from an old ZDNet post.) If you’re using Firefox on Ubuntu, right-click the full-size wallpaper image in your browser and select Set as Desktop Background.
You’ll also want to move the window management buttons—close, minimize, and maximize— located at the top-left corner of each window by default. Use this command to put them in a Windows-style order:
gsettings set org.gnome.desktop.wm.preferences button-layout 'menu:minimize,maximize,close'
To remove the Mac-style global menu bar and put the menu bar (containing File/Edit/View) back into each individual application window, run this command:
sudo apt-get autoremove appmenu-gtk appmenu-gtk3 appmenu-qt indicator-appmenu
You’ll have to log out and log back in for this change to take effect. Use the button at the top-right corner of your screen to log out.
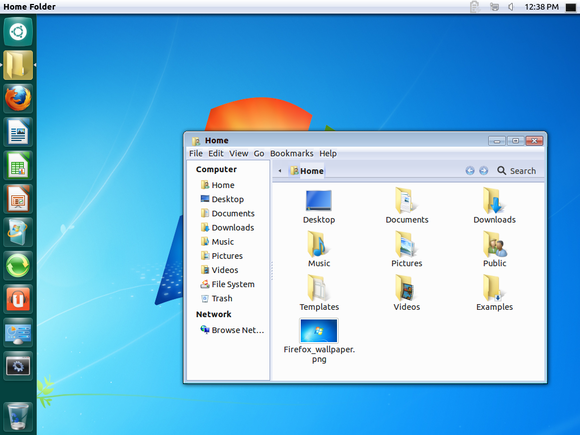
Do you like what you see? This is as close to Windows 7 as we’re going to get with Ubuntu’s default Unity desktop environment. If it doesn't quite scratch your itch, keep reading to learn how to create a more traditional Windows 7-style look using the Xfce desktop environment.
Installing and customizing Xfce
For this method, we’ll be throwing Ubuntu’s default Unity desktop out and going our own way. (Okay, we’re not actually throwing it out, just selecting a different environment on the login screen). Xfce is one of the most popular desktops that still offers a lot of configurability. Install it with this command:
sudo apt-get install xubuntu-desktop
Log out of Ubuntu using the menu at the top-right corner of the screen and click the icon next to your name on the login screen. Select Xubuntu session and log in normally. (You can install multiple desktop environments and toggle between them on the login screen like this.)
Xfce also uses a two-panel layout by default. We’ll have to do some heavy customization to get it looking more like Windows 7, but it’s all graphical—if you’re a Windows power user, you’ve done this kind of tweaking many times before.
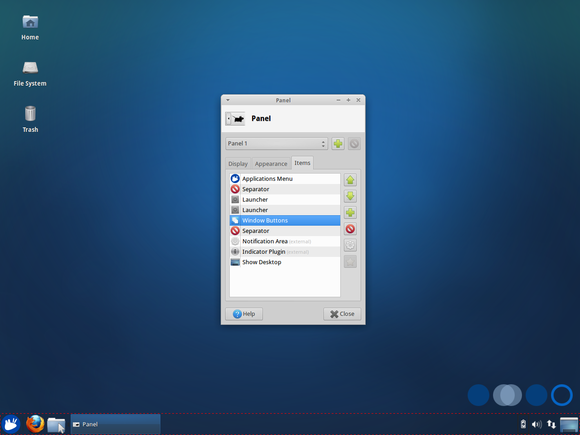
First, get rid of the top panel. Right-click it, point to Panel, select Panel Preferences, and click the red Remove button. Use the drop-down box in the panel configuration window to select the other panel. Uncheck the 'Automatically show and hide the panel' option and check the 'Automatically increase the length' option. Now we’re getting somewhere! At this point, you should have a single taskbar-like panel across that bottom of your screen.
Use the buttons on the Items panel to remove the items you don’t want, add the items you do want, and reorder them as you see fit. For a Windows 7-style taskbar, try using these items in the following order:
Applications Menu, Separator, Launcher, Window Buttons, Separator, Notification Area, Indicator Plugin, Show Desktop.
Add as many launchers (read: shortcuts) as you like to the launcher section and think of them as your new quick launch bar. Unfortunately, Xfce can’t group applications and open windows the same way Windows 7’s taskbar can, so it’s a bit more old school.
To configure an item, select it in the list and click the Gear button. You’ll also want to disable the 'Show button title' option in the Applications Menu item’s settings.
Theming Xfce to look like Windows
Now we just have to make Xfce look more like Windows 7. If you didn’t run any of the commands in the Unity section above, run the commands below in a terminal. (Right-click the desktop and select 'Open terminal here' to open a terminal in Xfce.)
sudo add-apt-repository ppa:upubuntu-com/gtk3sudo apt-get updatesudo apt-get install win2-7gsettings set org.gnome.desktop.wm.preferences theme 'Win2-7-theme'gsettings set org.gnome.desktop.wm.preferences button-layout 'menu:minimize,maximize,close'
Open the Settings Manager from the applications menu and click the Appearance icon. Select Win2-7-theme in the Style list and select Win2-7 in the Icons list.
Press Alt+F2 and run the following command to get Windows 7-style window borders. If you're typing this out rather than copying and pasting, note that the command includes a double-dash, not a long em dash.
metacity --replace
Go into the Session and Startup panel in the Settings Manager, select the Application Autostarttab, and click the Add button. Enter
Metacity as the application’s name andmetacity --replace as its command. Now Windows 7-style window borders will automatically start with your desktop.
To make your panel look more like Windows 7’s panel, right-click it, point to Panel, and select Panel Preferences. On the Appearance tab, select Background image and browse to the \usr\share\themes\Win2-7-theme\gtk-2.0\Panel\ directory on your computer. Select a background image like Panel_Win2-7Basic800.png. The theme pack we installed includes a variety of panel backgrounds, so feel free to experiment.
You can also change the applications menu’s graphic and make it use a Windows 7-style start orb. First, find a Windows 7 start orb image—you can find several on Google Images, but make sure you get a transparent PNG image. Once you’ve found a good image, right-click the Applications menu button, select Properties, and use the Icon button to select your start orb.
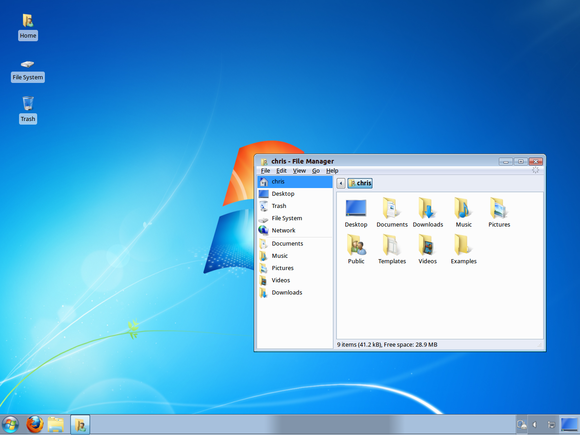
Phew, that took a lot of tweaking (and a lot of text)—but we now have a Windows 7-style desktop on Ubuntu. It lacks a Windows 7-style Start menu and taskbar, but Windows users that prefer the classic Start menu and taskbar behavior will find it immediately familiar.
Undoing your changes
Want to undo your changes? If you followed the first method, just run these commands. Remember to log out and log back in after running the commands to restore the global menu bar.
gsettings reset org.gnome.desktop.interface gtk-themegsettings reset org.gnome.desktop.wm.preferences themegsettings reset org.gnome.desktop.interface icon-themegsettings reset org.gnome.desktop.wm.preferences button-layoutgsettings reset org.gnome.desktop.background picture-urisudo apt-get install appmenu-gtk appmenu-gtk3 appmenu-qt indicator-appmenu
If you followed the second method, log out and select Ubuntu’s default desktop environment from the login screen. You can toggle between the two whenever you like. If you’d like to uninstall Xfce, use this command:
sudo apt-get autoremove xubuntu-desktop
These processes are a good demonstration of just how configurable Linux is. You can rip out software from the default desktop, use all sorts of themes, install a completely different desktop environment, or even build your own desktop environment by cobbling together pieces from different desktop environments—that’s what we did in the last section.
Still not sold on Linux? If you'd just like to use the Windows 8 desktop without all of the operating system's funky design and interface changes.
Tag :
How To
Why You Should Use a Password Manager and How to Get Started
Why You Should Use a Password Manager and How to Get Started

The majority of people use very weak passwords and reuse them on different websites. How are you supposed to use strong, unique passwords on all the websites you use? The solution is a password manager.
Password managers store your login information for all the websites you use and help you log into them automatically. They encrypt your password database with a master password – the master password is the only one you have to remember.
Don’t Reuse Passwords!
Password reuse is a serious problem because of the many password leaks that occur each year, even on large websites. When your password leaks, malicious individuals have an email address, username, and password combination they can try on other websites. If you use the same login information everywhere, a leak at one website could give people access to all your accounts. If someone gains access to your email account in this way, they could use password-reset links to access other websites, like your online banking or PayPal account.
To prevent password leaks from being so damaging, you need to use unique passwords on every website. These should also be strong passwords – long, unpredictable passwords that contain numbers and symbols.
Web geeks have hundreds of accounts to keep track of, while even the average person likely has tens of different passwords. Remembering such strong passwords is nearly impossible without resorting to some sort of trick. The ideal trick is a password manager that generates secure, random passwords for you and remembers them so you don’t have to.

What Using a Password Manager is Like
A password manager will take a load off your mind, freeing up brain power for doing productive things rather than remembering a long list of passwords.
When you use a password manager and need to log into a website, you will first visit that website normally. Instead of typing your password into the website, you type your master password into the password manager, which automatically fills the appropriate login information into the website. (If you’re already logged into your password manager, it will automatically fill the data for you). You don’t have to think about what email address, username, and password you used for the website – your password manager does the dirty work for you.
If you’re creating a new account, your password manager will offer to generate a secure random password for you, so you don’t have to think about that, either. It can also be configured to automatically fill information like your address, name, and email address into web forms.

Why Browser-Based Password Managers Aren’t Ideal
Web browsers – Chrome, Firefox, Internet Explorer, and others – all have integrated password managers. Each browser’s built-in password manager can’t compete with dedicated password managers. For one thing, Chrome and Internet Explorer store your passwords on your computer in an unencrypted form. People could access the password files on your computer and view them, unless you encrypt your computer’s hard drive.
Mozilla Firefox has a “master password” feature that allows you to encrypt your saved passwords with a single “master” password, storing them on your computer in an encrypted format. However, Firefox’s password manager isn’t the ideal solution, either. The interface doesn’t help you generate random passwords and it lacks various features, such as cross-platform syncing (Firefox can’t sync to iOS devices).
A dedicated password manager will store your passwords in an encrypted form, help you generate secure random passwords, offer a more powerful interface, and allow you to easily access your passwords across all the different computers, smartphones, and tablets you use.

Password Managers to Use
A variety of password managers are available, but two stand out as the best options. Each is a solid option, and which you prefer will depend on what’s more important to you:
- LastPass: We love LastPass here at How-To Geek. It’s a cloud-based password manager with extensions, mobile apps, and even desktop apps for all the browsers and operating systems you could want. It’s extremely powerful and even offers a variety of two-factor authentication options so you can ensure no one else can log into your password vault. We’ve covered LastPass’s many security options in great detail. LastPass stores your passwords on LastPass’s servers in an encrypted form – the LastPass extension or app locally decrypts and encrypts them when you log in, so LastPass couldn’t see your passwords if they wanted to. For more information about LastPass, read our guide to getting started with LastPass.
- KeePass: LastPass isn’t for everyone. Some people just aren’t comfortable with a cloud-based password manager, and that’s fine. KeePass is a popular desktop application for managing your passwords, but there are also browser extensions and mobile apps for KeePass. KeePass stores your passwords on your computer so you remain in control of them — it’s even open-source, so you could audit its code if you wanted to. The downside is that you’re responsible for your passwords, and you’ll have to sync them between your devices manually. Some people use a syncing solution like Dropbox to sync the KeePass database between their devices. For more information, check out our introduction to KeePass.

Getting Started with Your Password Manager
The first big decision you will need to make with a password manager is choosing your master password. This master password controls access to your entire password manager database, so you should make it particularly strong – it’s the only password you’ll need to remember, after all. You may want to write down the password and store it somewhere safe after choosing it, just in case – for example, if you’re really serious, you could store your master password in a vault at the bank. You can change this password later, but only if you remember it – if you lose your master password, you won’t be able to view your saved passwords. This is essential, as it ensures no one else can view your secure password database without the master password.
After installing a password manager, you will likely want to start changing your website passwords to more secure ones. LastPass offers the LastPass Security Challenge, which identifies the weak and duplicate passwords you should focus on changing.

Password managers also allow you to store other types of data in a secure form – everything from credit card numbers to secure notes. All data you store in a password manager is encrypted with your master password.
Password managers can even help against phishing, as they fill account information into websites based on their web address (URL). if you think you’re on your bank’s website and your password manager doesn’t automatically fill your login information, it’s possible that you’re on a phishing website with a different URL.
Picture Credit HowToGeek Website
How To: Unlock Your iPhone 3G/iPhone 3GS (3.0.1 Firmware)
So like the iPhone but not so keen on AT&T? Or maybe you want to travel over the pond to Europe and would rather not get hit with the ridiculous international roaming charges?
No problem, here is how to unlock your iPhone 3G or iPhone 3GS on firmware 3.0.
UPDATE July 31st 2009: THE NEW 3.0.1 FIRMWARE IS OUT, IF YOU HAVE THIS FIRMWARE YOU WILL NOT BE ABLE TO JAILBREAK YET (UNTIL WE CAN JAILBREAK 3.0.1). WHEN THAT HAPPENS, WE WILL POST AN UPDATE IN THIS POST.
1. Follow the procedure for the How To: Jailbreak Your iPhone and then come back to this procedure.
2. After you have jailbroken your iPhone, goto Settings > General > Network and then turn OFF 3G and turn ON Data Roaming.
3. Goto to Settings > WiFi and then turn ON Wifi and connect to a Wifi Network that you have access to.
4. Now, Â open Cydia on the second page of the home screen.
5. If this is the first time opening Cydia, it will “reorganize” itself and automatically close. Open it back up after it is done.
6. Select Upgrade Essential when it asks about the upgrades it found and then click Install.
7. Once that is installed and Cydia closes, open it back up and click on Manage, then Sources.
8. Then click on Edit at the top right and then click Add at the top left.
9. In the URL input field that pops up, we are going to type (make sure that the 0 in “ultrasn0w” is the number zero not the letter o):
repo666.ultrasn0w.com
then click Add Source.
10. After it refreshes the Sources, click Done at the top right.
11. Then click on the UltraSn0w source at the top of the list and it will slide to the left to reveal the UltraSnow application.
12. Click on the UltraSn0w application and click Install then Confirm.
13. It will install and ask you to click Return to Cydia. Do so then click the Home button and turn off the phone.
14. Turn the phone back on, and put in any SIM card you like to test that you have an unlocked iPhone!
Optional: To get internet access for T-Mobile here in the US:
I. Goto Settings > General > Network and make sure 3G is OFF and Data Roaming is ON.
II. Goto Settings > General > Network > Cellular Data Network and in the field marked APN type one of the following (some work better for others):
wap.voicestream.com
internet.voicestream.com
internet2.voicestream.com
internet3.voicestream.com
III. Leave the Username and Password fields blank and then click the Home button. Open Safari browser and test it out.
Reported Issues
None reported…
How to Root/Hack HTC Amaze 4G

HTC Amaze 4G, also known as HTC Ruby, is an Android smartphone launched back in November 2011. The phone runs on the Android 2.3.4 Gingerbread version which is quite a good version of the OS in terms of functions and performance. When you get your hands on this Amazing Amaze 4G smartphone, you will probably want to root it so you can install apps which require Superuser access, like Barnacle WiF Tether. Following guide shows you how you can root your HTC Amaze 4G smartphone.
I. Before You Begin:
1. Rooting your phone voids it’s warranty, however, it can be gained back by applying either stock firmware or unrooting your phone.
2. Your phone should have at least 50% of battery life left to go through the process without any problems.
II. Downloading Required Files:
III. Installing HTC Drivers:
1. Double-click the HTCDriver3.0.0.007.exe file to launch it.
2. Follow the on-screen instructions to install the drivers.
IV. Rooting HTC Amaze 4G:
1. Extract files from the Root Package to the Desktop of your PC. It will prompt you for the password, which is androidadvices.com.
2. Enable USB debugging on your phone by going to Menu>>Settings>>Applications>>Development>>USB debugging and tick-mark the box.
3. Connect your phone to the PC using the USB cable.
4. From the files you have extracted, go to Zerg rush root folder and launch the ZergRushTempRoot.bat file. It will start rooting your phone.
5. When the rooting is done, just disconnect your phone from the PC.
Well done, you have successfully rooted your phone. Now, you can load custom ROMs on your phone as well as you can install apps which require the Superuser access.
If this procedure saved you from hassles of issuing commands to root your phone, then please thank/donate the developer of this root method over at XDA, who provided us the single-click root method.